Friday Q and A

Whether it is through comments or email, I often get questions from my my readers about the world of Interior Design. For some people, the whole idea of paying someone to come into their home and tell them what to do just seems foreign. There are also many misconceptions about the art of interior design and how Designers operate, and even some confusion that exist within our industry.

I enjoy getting your questions and just being able to help someone solve a design problem or simply point them in the right direction.

I decided to do a Friday Q and A series here on The Naked Decorator, where my readers will have the opportunity to post a question in the comments field and I will do my best to answer. Your question and my answer will be visible to others, so everyone can benefit from each other’s questions.

Your questions can be anything from my role as an Interior Decorator, my business or a project I’ve worked on, a decorating question or challenge, a question on a product or vendor, a general industry question such as standard fees, best practices etc.

I don’t claim to have all the answers, but I will do my best to answer to the best of my ability. Please keep in mind, however, that there are certain specifics that I cannot discuss, or get very in depth about, but rest assured that all questions will be answered as quickly as possible

Please know that your questions are always welcomed here at The Naked Decorator, any day of the week, but I just wanted to set aside a day focused on interacting with my readers, and personally addressing any questions you may have.

It’s quite ok if you don’t have a question, simply leave a comment as you normally would. My goal is to make Friday Q and A engaging, where we can all learn from each other, inspire some creativity and hopefully help you make your home the beautiful and comfortable haven it is meant to be.

So whether you are a DIY-er, or looking to hire a professional like me, or have just been curious about what we do, you will find some answers to your most pressing decorating questions. So ask away…….. :-)

Ok, so Friday Q and A starts NOW! :-)

In the meantime, please enjoy this shot of a dining room I completed a couple of years ago. You can view more of my work HERE

Design By Veronica Solomon - Casa Vilora Interiors Photography by Diana Simonetta

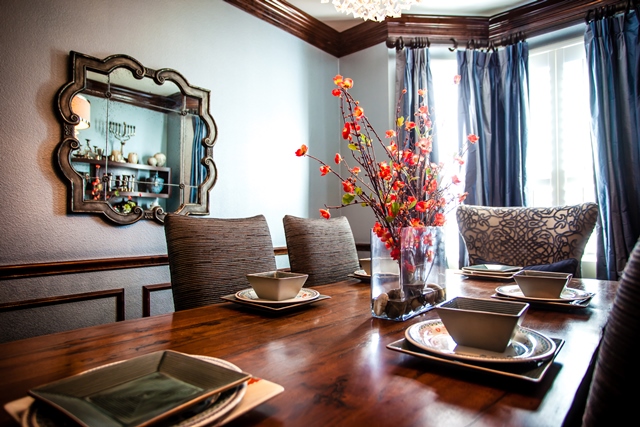
Design By Veronica Solomon – Casa Vilora Interiors
Photography by Diana Simonetta

Please click to VeronicaSolomon.com for my full profile where you can contact me, connect with me on social media, view my portfolio, and shop my Ecwid storefront

Wishing you all a FANTASTIC Friday!!

Be Inspired!

Veronica Solomon, Casa Vilora Interiors VeronicaSolomon.com

Veronica Solomon, Casa Vilora Interiors
VeronicaSolomon.com


Tip For Tuesday: Decorating With Mirrors

Mirrors got a very bad rap when folks would add wall to wall mirrors back in the 70′s and 80′s.

But mirrors are still a great design trick for creating the illusion of a larger space especially in a small room.

Mirrors add an instant sparkle and depth in a room. What’s great is that it reflects light and enhances a beautiful vignette or feature that it is reflecting

Now here’s an example of how to properly do a mirror in a room

Source: HGTV.com Design By: Erica Islas Photography By: David Young-Wolff

Source: HGTV.com
Design By: Erica Islas
Photography By: David Young-Wolff

  • Add a floor length mirror wherever possible, especially in a bedroom
  • Use a framed or beveled mirror
  • Use mirrored furniture, but sparingly
  • Hang a wall mirror at the proper height
  • Make sure the mirror is reflecting something pretty
  • A wall of mirrors is great if it is done in an artful way
Source: Cococozy.com

Source: Cococozy.com

Now go forth and decorate with mirrors without fear. If you need inspiration, click here to view a cool post I wrote a while ago featuring some gorgeous mirrors.

Hope all is well in your world, and best wishes for a great Tuesday!

I have slipped a few notches down to #51 on Top Mommy Blogs, so please continue to vote by clicking the icon below. This takes you directly to the Top Mommy Blogs homepage and it automatically counts as a vote for me. You can also rate and comment by clicking the Home and Garden category from the list on the right. Look for The Naked Decorator and click a cupcake to vote and leave a comment. Thanks so much for voting!
Just Click To Send A Vote For Us @ Top Mommy BlogsPlease click to VeronicaSolomon.com for my full profile, where you can connect with me, contact me, view my portfolio and shop my Ecwid storefront
Be Inspired!

Veronica Solomon

Veronica Solomon


Designer Thingies: What The Heck Is It?

While my blog contest is still in effect, I promised to post the article with the details of the contest each day until Monday, June 3rd when I announce the winner. But me and my OCD, I couldn’t bring myself to posting the same article three days in a row :-), not that there’s anything wrong with doing that :-)

I still want to give everyone a good chance to win the fabulous prize for naming the new mascot for “No Naked Windows”, so I decided to add the link to the blog contest in my post for today. Feel free to hop on over there and participate. You could be the lucky winner! :-)

Here’s the link: Name The New Mascot For “No Naked Windows”. Good luck!

Ok, let’s get to today’s short post (It is so last minute, so please bear with me :-) )

Every once in a while I will be featuring a special tool or product that we use very often in the design world, that may (or may not) be unknown to you if you don’t work in the industry, and will probably leave you wondering, “What The Heck Is It?” You, my loyal readers will then leave me a comment with your best guess of what the heck the tool or product is, and what it is used for. I will provide the answer to the question in my blog post for the following day.

I promise I will never make it too difficult to guess :-)

Ok, here’s our product for today. Can you guess what the heck it is? and what is it used for?

9317-7-5-09-05-12

Please comment below with your best guess of what the heck this product is. I can’t wait to see the answers you come up with! Have fun guessing!

Please come back to my blog on Monday, June 3rd when I will reveal the answer to what the heck this product is! I will also be announcing the winner of my blog contest – Name The New Mascot For “No Naked Windows” in the same post on Monday.

Ok, I can’t just leave you hanging today without providing some valuable decorating tips and information in today’s article. So with that in mind, here are 6 quick tips for summer decorating in your home:

Photo: House Beautiful

Photo: House Beautiful

  1.  Bring the outdoors in and the indoors out. – Add some colorful throw pillows to your patio furniture using indoor/outdoor fabrics. Add an outdoor area rug to define the seating area. Add a dining area for al fresco summer dining.
  2. Switch out your coffee table or end tables with some colorful garden stools. Overstock.com has a great selection.
  3. Decorate with fresh flowers. You may even switch out your typical flower vases to colorful lemonade pitchers for a bit of whimsy. Pier1.com has a great selection.
  4. Wallpaper the back of a bookcase or a closet in a fun or colorful pattern. MuralsYourWay.com has a great selection of removable and re-usable wallpaper
  5. Organize and store in pretty containers. Add some floating shelves to a dead wall space or add colorful containers in the kitchen to store cookies and such. ContainerStore.com has tons of solutions for storage.
  6. Add decorative throw pillows indoors in fun and trendy colors and patterns for some pizzazz. My online store has a great selection

Ok, that’s all I have for you today. Don’t forget to stop by my previous blog post and participate in the “Name The New Mascot For No Naked Windows” contest. The winner will be announced on Monday, June 3rd, so enter as many times as you like until then.

I will also be revealing the answer to “What The Heck Is it?”, so please join me on Monday.

Please don’t forget to comment and share :-)

Click here to contact me or connect with me on my social media sites

Have a fabulous weekend! :-)

Be Inspired!

197313_10150147243155629_734385628_6440473_3223277_n


Quick Update On The New Home

Hello All! For those of you who have followed the progress of my big life change of downsizing my home at age 40, I thought I’d give you a quick update on how things are progressing. If you are interested in reading the previous articles I wrote about this, you can find them herehere and here.

The sale of my current “mansion” is still pending and should be closing escrow in two weeks. The new buyers are gracious enough to let us stay in the home for another two weeks until we close on our new home being built! What a relief to not have to move twice in one month! The new buyers are very excited to be be moving into this great home and community….they even already have mail coming here! :-) . I know they will be happy here just as we have been for the last seven years.

Ok so I know you all are ready to see some pictures, so without further ado, here goes!

photo (7)

photo (15)


It definitely looks like a family home now! the exterior has been completely painted and stained. Landscaping installed and the light fixtures (which will be replaced for sure) have been added. They actually forgot to add brick to the floor of the front porch, so that remains to be done. As you may be able to see, I do have electrical wires behind my home (not the junction box), but it was s small price to pay for not having back neighbors. I love neighbors as much as the next guy, but sometimes in the confines of my own home and backyard I do take “The Naked Decorator” thing literally! Just kidding…or not :-)

photo (13)

The cast stone fireplace has been installed. This is actually an upgrade from the one in my current home. I love the rough texture of this one, which will go very well with the updated country french direction for the new decor. Notice that my ceilings are low….I have 20 foot ceilings in my current home which was actually a great feature when I was buying the home. I wanted cozy instead of volumnous ceilings in this new home. I have a few tricks up my sleeve to make them appear just a tad bit higher…..but you will have to stay tuned for that :-). I plan to add hand-sawn faux wood beams to really play up the fireplace. Of course, the handscraped hardwood flooring will also be a nice feature when it is installed soon.

photo (12)

photo (14)

Kitchen cabinets are in! I wanted a lot of storage since this home is half the size of my current home. I plan to convert the big walk-in pantry behind the white door into a butler’s pantry with glass fronts for even more “pretty” storage. I went really dark with the cabinetry (which wasn’t my first choice) because the other choices in my budget range had red undertones (no more red!). These dark stained maple cabinets will be  a nice contrast to the white travertine backsplash and granite countertops and the rest of the decor, which will be in soft shades of grays and mossy greens….very cool color palette

photo (9)photo (10)

photo (16)

This is the smallish master bathroom (really filthy now, but that’s construction :-)). This bathroom is less than half the size of my current bathroom and I’m happy! Why? I don’t enjoy cleaning bathrooms! :-). My existing master bathroom has separate dual high-low vanities… I am single, so I just need one! No more jetted tub (I hardly use the one I have now), and now the wall tiles aren’t the 6×6 white ceramic tiles with a gazillion grout lines to clean! That’s definitely an upgrade :-)

photo (3)

This is the big compromise that we had to make here. This small bathroom will be shared by my daughter and son and guests (when we do have them). They now share a very large jack and jill bathroom, so at least they have a bit of privacy. There is also a separate guest bathroom (that never gets used but somehow always ends up dirty :-)), and a powder room. My daughter was really looking forward to her own bathroom, but oh well, she’ll live! :-)

There is so much left to be done, and I am actually a bit worried that they will not make the deadline of end of month. Fingers….and toes crossed please?! :-)

We are definitely looking forward to the move. I am especially happy that with this move, in about 10 years….maybe eight if I stop buying shoes :-), I will be completely financially free, mortgage included. Downsizing is definitely worth that!!

Thanks for reading my story….as boring as it is :-)

Please don’t forget to leave a comment. I’d love to hear what you think about the “quick” update on the new digs!

Be Inspired!

Veronica Solomon

Veronica Solomon


Design Dilemma: The Black Leather Sofa!

I have to be honest with you…..It’s a designer’s worst nightmare to walk into a consultation with a client, and be informed that their black leather sofa set from college has to be  a part of the new decor!

A few years ago I received a call from a newly wed couple in their early twenties. Such a cute couple they were. They had just bought a home, and of course just paid for wedding, so their budget was very limited. They wanted to have a nicely decorated home since they entertained a lot. Most of their furnishings were hand me downs in different styles from different design periods, garage sale finds, and stuff left over from college. Of course, my ultimate nightmare….a black leather sofa, loveseat and a reclining chair to match! Being the fabulous decorator I am, I accepted the challenge :-) Since they were on a tight budget, I just helped them to come up with a decorating plan that they could tackle in phases on their own, and of course work around the black leather sofa set. I don’t have photos from that project, but I pulled some photos from various sources found on the internet to illustrate some of the ideas I shared with them to address their design dilemma.

So if you are the proud owner of a black leather sofa set, don’t lose hope…..Every design dilemma has a fabulous solution. Follow these five tips to making black leather look intentional and work in your home beautifully.

1. Offset the darkness of the black leather with lighter colors. Paint the walls a soft, warm white or a soft taupe or gray. Add lighter colored throw pillows in a nice mix of patterns and textures to breakup the large expanse of black leather. If you already have occasional tables in a dark finish, consider painting them a lighter color as well. Add a patterned area rug to pull some of the focus away from the leather goods. It also helps if the predominant color of the rug is a light color.

This sofa is a bit more elegant than the one we had to work with, but the same principles apply.

white-paint-colors-interior-decorating-ideas-10


the-selby


2. Playup other focal points in the room and shift focus away from the black leather. You can do this by adding large scale and colorful artwork on the walls, adding a tall bookcase that is styled very well, adding drapery panels in a great fabric, or highlighting the existing focal points in the room, such as a fireplace.

f5f179bd0fbfad0a_9355-w406-h406-b0-p0--eclectic-living-room


leather2


2b31ece50b6b01a6_1000-w406-h406-b0-p0---


3. Consider using just one piece from the collection and moving the other pieces into another room. Not because they were purchased as a set doesn’t mean they have to stay together forever. It is very overwhelming to have a room full of matching black furniture. Breaking up the set will give the room a more collected and homey feel with a lot more personality, especially if you are working with hand me downs and pieces from different styles and periods. Just maintain a common color theme to tie it all together.

black red 3


Decorating-for-Small-Spaces-living-room-1010-de


4. Consider re-covering the seat cushions. This solution probably won’t work with every sofa, but if you are going for a more traditional look, and the sofa isn’t too contemporary and streamlined, this might work great. Check out the remnant section of your local fabric store and choose an upholstery grade fabric with a color and pattern to complement the room. Find a good upholsterer and have the sofa cushions re-covered with a zipper opening for easy cleaning later. Re-covering the cushions will help break up the large expanse of black leather. Then add your throw pillows and a throw blanket to finish off the look.

These examples are dark brown and not black leather, but will hopefully give you an idea.

Eho-JB669-Sofa


sofa-3


5. Color change or dye the sofa. Believe it or not, you can actually change the color of a leather or vinyl sofa to an easier color to decorate around, like dark brown or tan. I have never done this or commissioned this myself, but have found information than it can easily be done as a DIY project. (I am therefore not endorsing this method, but giving you food for thought). Here’s a link to a video I found that explains how.

Of course there is the option to completely reupholster the black leather sofa using a great fabric. From my experience, however, it can be just as expensive, or even more than buying a new sofa. If the sofa frame is of quality construction, then it may be a cost effective method in the long run and the options are endless to customizing the fabric. A master upholsterer can even change the shape and size (within reason). Care should be taken when selecting fabrics for upholstery. You can read my recent blog post about “How To Look For Quality Upholstery” here

2294591546_6ac1643c5e_o


black-leather-furniture-covers


As you have just learned, there are definitely clever ideas you can use to breakup the look of black leather and make it feel like it belongs in a beautifully appointed room. Leather does have great benefits like being easy to clean and comfortable for the family, so if function is high on your priority list – you can certainly have the best of both worlds!

Please don’t forget to comment and share :-)

****Reposted 1/24/14

Be Inspired!

Veronica Solomon

Veronica Solomon


7 DIY Decorating Ideas Under $100

You asked for it, and here it is – A list of practical decorating ideas that you can do yourself for under $100. So without further ado, here goes:

1. Ceiling Medallions As Wall Art

You’re familiar with those plaster or plastic ceiling medallions used for hanging light fixtures…right? Bet you won’t look at them quite the same.

ceilingmedallionwalldecor_xxlarge


Medallians


They can be painted into whatever color your heart desires and can easily be hung with a picture hanging kit from Home Depot or Lowes. Hanging them in groupings have a much bigger visual impact. Take a look

adcbcec863965257177015621_hGNEOvlp_c


ss_101024104


2. Fabric Covered Boxes

If you have fabric remnants left over from another DIY or sewing project, you can use them to cover wooden boxes. You can find these at your local craft store like Michael’s and Hobby Lobby. Your local fabric and craft store may also have fabric remnants for very little cost.

diy-fabric-covered-boxesb


Fabric covered boxes make a great decorative element when styling bookshelves or they work great for storage in other parts of your home. Here’s a quick how-to instructions on creating your own fabric covered boxes from Centsational Girl Blog

Stack-of-fabric-covered-box_thumb5-cheap-home-decor-02


3. Children’s Artwork As Framed Originals

I have touched on this one before in a previous blog post “It’s The Little Things”. Kids create such wonderful and colorful art, that always have a fun or cute story behind them.

home-design


All you need for this project is artwork, matte boards and frames, which are available at Micheal’s or Hobby Lobby. Hanging them salon style or in a neat grid on one big wall has such a major impact, not just on your decor, but on your child’s self confidence and creativity.

tumblr_lqq6pemhNu1r2v5r9o1_500

FRAME-~1


4. Decorating With Burlap

It’s no surprise that these days burlap has become widely popular and in demand for home decor. You can now find burlap on fine upholstery, pillows, drapery and home accessories. But did you know that burlap was used for packaging coffee and sugar? The rustic, textural character of burlap is what makes it so desirable. It lends itself to a homey, cozy feeling, which is always welcoming in home decor.

1850321-entry-hall-xl[1]


It is now available in colors other than the traditional beige/brown color. In fact we have custom burlap drapery panels available on our online store starting at just $269 per pair! But if you have basic sewing skills, you can make your own for under $100.00. Or maybe a pillow, tableskirt or even a wreath is more within your comfort zone? Here are some inspiration photos

burlap-flowers-and-twigs-fall-wreaths-and-decor-ideasburlapoverlay


5. Wallpapering The Back Of A Bookcase

Built-in bookcases are a great architectural feature in a room. Why not dress them up with remnant wallpaper that you can find at your local wallpaper supplier quite inexpensively. Peel and stick wallpapers are widely available online in wonderful colors and patterns. Roommates Wall Decals is a great place to start.

wallpapered-bookcase-bhg


One thing to consider when picking a wallpaper for this application, is to look for bold or geometric patterns or a pattern that will not get lost behind the decorative accessories that will be placed on the shelves. keep accessories to a minimum, as the wallpaper is the big feature and you want to avoid a cluttered, over decorated look

Picture 4936451078203935498_qlp7EoYG_f1


6. Painting An Accent Wall….. Or Four, With Large Horizontal Stripes

Painting an accent wall a darker or bolder color is a great way to add a focal point to a room that lacks any architectural interest. Instead of stopping at just a solid coat of paint, why not do a horizontal stripe detail?

feng-shui-bedroom-decor-blue-white-stripes


Depending on the mood you want to create in the room, you can go with 2 colors with a high contrast for a bold look, or two colors that are close in value for a more monochromatic or tone-on-tone look. Metallic paints work great for this application as well, but keep in mind that metallic paints will cost a bit more. The stripes should be at least 8″ thick for a more updated look. Here are instructions for creating horizontal stripes in a room

12_20_09-pink-striped-bedroom-bed-bhgrobert-passal black white striped walls decorati


7. Electrical Wire Spool As A Table, Stool Or Ottoman

This one is my personal favorite! Who knew that such beautiful pieces could be made from those not so attractive, industrial spools. Electrical wire spools can be found at electrical supply stores or do a google search and you will find many resources for where you can purchase them very inexpensively.

7c5ff49aaf5d85e377f10ada55cb5ba8


The structure of the spools themselves don’t require alot of rework. A can of paint is enough to transform them into something special. But if you want to take it a few steps further….check these out.

aaaf3b7d3e3844936067774aed9a85e0702f0897a22cbd255add841b76d28a0b

SAMSUNG DIGITAL CAMERA


b599a042e459b71bfd5b75eab8414fe6


So there you have it – A list of seven fun DIY decorating projects for under $100. Now it’s time to go forth and decorate! :-)

Please don’t forget to comment and share if you found these tips useful. You can also check out my monthly newsletter “Pocket Decorator” for more fun design tips, ideas and inspiration. Click here to subscribe. I promise I won’t flood your inbox with emails.


Be Inspired!

Veronica Solomon

Veronica Solomon


Small Change, Big Style

Making change in your home is good, but the thought of a major renovation or even a small redesign can be overwhelming for a lot of people, and I can fully understand why. There is absolutely a certain amount of upheaval involved in any renovation or redesign project, not to mention interrupting your normal household routines. Having to make choices on products and projects add to the stress.The truth is that change is scary for some people, which is why many homes stay exactly the same year after year, even though the homeowner might want to make changes.

I am a big believer that refreshing your home, even once every couple of years can do wonders for improving your lives. Who doesn’t feel better walking into a well organized, beautiful space where everything is in its proper place, and where comfort reigns. Good design has the power to change lives.


Perhaps you are not in the market for a renovation, or even ready to hire a designer to update your home. There are a few tips I can leave with you for small changes to help breathe some new life into your living space. But before I do, I’m giving you a heads up on a new design service I will be offering to clients in the weeks to come, called “Mail Order Decorator”. It is basically a do-it-yourselfer’s guide to decorating your home with the direction of an interior designer. You provide all the measurements and digital photographs of the room to be decorated, fill out a style questionnaire and we’ll provide you with a design plan for the room including all the elements for a complete design – space plans, elevations, furniture layout, paint color selection, window treatment design, furniture and fabric shopping list and even a break-down of cost. All items will be available to shop for online or locally. it will all be done via email and mail.  Be on the lookout for that soon by visiting our online store and subscribing to our blog!

If you are ready to just go for it this weekend and bring the spring feeling into your home, here goes!

Paint


TIPS you can use:

  1. Paint – Is a relatively quick and inexpensive way to change the look of  a room immediately. it’s also a great DIY project. So take  a good look at the walls and trim and even the floor and see how painting can add big style
  2. Flooring – This is one of the biggest surfaces in a room and changing it can make all the difference in the world. Pulling up carpet and replacing with a good quality laminate or even a peel and stick tile can add instant style!
  3. Lighting – Lighting is a great addition to lighten and brighten a room. Consider changing out the acyual fixtures as well, to more stylish updated ones
  4. Window Treatments – Are they dated and covering up views to the outdoors? Drapery panels are a quick and inexpensive way to turn up the style factor in any space, while still preserving your views. We have an awesome selection available at our online store that you can customize to suit your needs.
  5. Add Trim – adding moldings or replacing base boards is a great way to add personality to a room
  6. Cabinetry – Adding built-in cabinetry is great for added storage and hiding away the things you don’t want out in the room. If you have existing cabinetry that might be dated, priming and painting will make a world of difference
  7. Accessorize – This is another great way to add personaluty and warmth in a  room and make it look finished.

Refreshing you master bedoom, is a great weekend DIY project


Be Inspired,

Veronica Solomon

Veronica Solomon