I regularly receive emails from folks asking about budget decorating, especially how to take an inexpensive piece of furniture and making it look fabulous. To address those questions, I decided to do a little segment every once in a while on my blog called “Budget Decorating” where I will highlight some projects done on a tight budget.
I have to admit that Ikea was never a place that I have shopped in the past for my clients, but I have found that one or two pieces placed in the context of a well designed room works just as well as a pricier piece.
I myself, have used a couple of their pieces to fill some space and add some function in my new work-in-progress design studio.
The office area (formerly the only bedroom in this old Victorian) is currently set up as a place to sit with my clients and discuss the numbers part of their design projects, review and sign contracts etc, and where I will be doing paperwork. I wanted it to be comfortable, light and airy and a clutter-free zone. I will be showing the finished space in a future blog post, but for now I wanted to focus on how I addressed a dead space that is the walkway to the other rooms in the space.
Since I am on a really tight budget I decided to bring in an inexpensive Ikea etagere to fill the area without visually or physically taking up space. I chose the etagere because it was open, with very clean lines and had glass shelves that helped to give it a less obtrusive appearance.
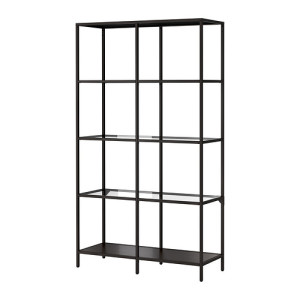
Ikea Vittsjo Shelving
The etagere started out as a box of parts, and I am eternally grateful to my friend Courtney for helping me put it together. He was able to assemble it in about half an hour. The cost for this run of the mill metal shelving was $70.00
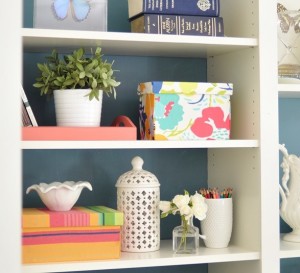
Here’s what it looks like now

After Styling of teh Ikea Vittsjo Shelving
I now call it an etagere because that sounds a bit more fancy than shelving. ![]()
For about $120.00 I was able to solve the issue of the dead space in the walkway with something beautiful and functional. Most of the tcotchkes you see here, are just left overs from long ago projects or things laying around my garage from my recent move. I did purchase the new picture frames (pictures of the kids will be added ![]() ) and rosette candle holders from ZGallerie. The etagere provided a great place to display a few of my design books and magazines.
) and rosette candle holders from ZGallerie. The etagere provided a great place to display a few of my design books and magazines.
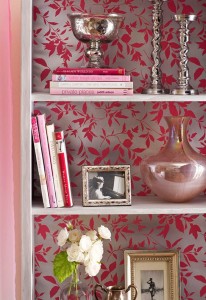
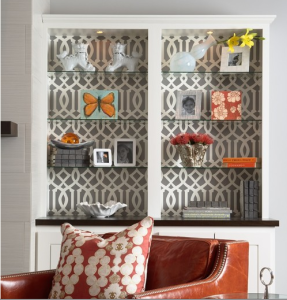
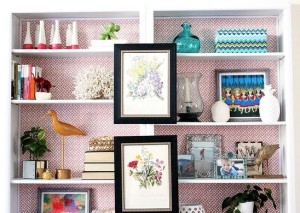
The key to styling a bookcase, etagere or shelving is to mix up the textures, layering, adding various heights and levels, adding softness with florals, keeping the colors fairly consistent or complementary, and using things that have special meaning to you. I displayed a few of my favorite design books & magazines, and my 1920′s peacocks are a favorite treasure – I love peacocks and birds in general ![]()
Other items that you can use are baskets or storage boxes on the bottom shelves to add some visual weight and ground the whole unit. I chose not to because I wanted to keep it open and airy.
This etagere can be used in any room of your home really – In a kitchen as extra storage for cook books, wine bottles or dishes. In a bedroom closet as a place for shoes or sweaters. In a game room or kids’ play area for storing games and toys. In a laundry room for storing detergent and cleaning supplies. In a garage to get things up off the floor (if you’re anything like me ![]() ), and even in the pantry for storing cereal boxes and canned goods. You can even ”bunch” two or three or more side by side to fill a large wall space and add tons of storage in a room.
), and even in the pantry for storing cereal boxes and canned goods. You can even ”bunch” two or three or more side by side to fill a large wall space and add tons of storage in a room.
Where would you use this Ikea etagere and what are some favorite items you would display? Leave me a comment below
One more thing before I go. If you like Ikea prices but not necessarily the look of some of their pieces, this website has tons of products and ideas that you can use to add some fabulousness to a plain piece. Check out O’Verlays Decorative Fretwork Panels to see what I mean
I hope you have been inspired by my budget decorating! Now go forth and decorate! ![]()
Please share this post and contact me here if you have any questions about my design services. You can also connect with me on social media through the same link.
Visit my online store to purchase designer bedding, pillows, rugs and the recently added doggy styles (dog fashion, beds and carriers).
Have a very blessed Monday!
Be Inspired!

Check out the new DOGGY STYLES category on our online store


![1850321-entry-hall-xl[1]](https://nonakedwindows.com/Blog/wp-content/uploads/2013/05/1850321-entry-hall-xl1-285x300.jpg)