Tip For Tuesday: Painting Lampshades

I have seen time and time again, clients who have a storage full of old lamps that they don’t use anymore for one reason or another. If you are one of those people, you might want to take a second look at those lamps before putting them out on the curb on trash day.

You can change the look of old lamp by spray painting it. But did you know that you could even spray paint the shades? You sure can! You can go further by adding embellishments too.

Check out a recent blog post where I spray painted some old lamps that I had in storage. Click here

And incase you are curious about how to spray paint the lampshades, here is a video showing just how simple it is.

Now wasn’t that easy?

Painting your lampshades isn’t restricted to just a solid color. This is a great opportunity to do something fun and unexpected.

Here are a few examples of beautifully painted lampshades with patterns and designs

Aren’t’ they all beautiful? They are certainly works of art!
painted lampshades

Source: ElecticallyVintage.com Painted with Chalkboard Paint

If you are not comfortable with free-handing a design on a lampshade, try using a stencil. Stencils are available at any craft store like Michael’s or Hobby Lobby. If you would rather not use a stencil, you can try something like a simple monogram, stripes, or color blocking……or even chalkboard paint! How creative is that!
painted lampshades

Source: Turnstyle Vogue

You can get as creative as you like – Using watercolors to create an abstract design in the colors of the room would look amazing!
painted lampshades

Source: Pinterest

But incase you aren’t sure which route to take, check out this Pinterest board with some great ideas for painting lampshades.
painted lampshades

Source: Jones Design Company

And just before I wrap this up…….
I also came across this amazing website called Twig based in the UK that features some great ideas for hand painted lampshades. Check it out
handpainted lampshades

Source: Twig

hand painted lampshades

Source: Twig


This one is very detailed and so beautiful! I could see this one in my home

Painting lampshades is a great way to decorate for the seasons. You can pick up paper lampshades inexpensively at any craft store and paint one for each season. Maybe a pastel color with birds and flowers for spring, autumn leaves for fall etc.

What are your thoughts on painting lampshades?

I hope you are inspired to create something beautiful today!

Be Inspired!

Casa Vilora Interiors

Veronica Solomon, Casa Vilora Interiors
VeronicaSolomon.com


Affordable Luxury For Your Home

Affordable luxury is a big part of what drives my designs for my clients. I like to help my clients enhance their homes and their lives without breaking the bank. Keeping one eye on making a room look fabulous and the other on keeping it affordable has served me well in my business for as long as I have been practicing.


Family Room

Family Room


This is a family room that I recently completed for a family of four who desired a cool, calming effect but very comfortable and low maintenace. Certainly you don’t think white when you think low maintenace, but my clients loved a monochromatic palette of whites, soft grays, greens and blues and wanted to use that palette throughout their home. We used a pair of slipcovered sofas from Pottery Barn as the main seating. Slipcovers give them the option of cleaning the sofas for those inevitable spills. We also fabricated custom pillows with hidden zippers on the covers that can be removed for easy cleaning. We anchored the room with an existing dark wool area rug that can take heavy traffic. We considered bringing in a new area rug in softer, cooler colors, but since budget was a concern, we had to make this one work. By focusing on the blues and whites in the area rug, it worked very well with the rest of the room.

My clients loved the look of living rooms seen in shelter magazines, but did not want to spend alot of money to achieve that same look. They had a collection of folk art and religious sculptures from artists in their home country of Venezuela that they wanted to use instead of purchasing all new accessories. All these pieces were arranged in the built-in shelves and the tables in the room. These pieces were all colorful reds, blues, golds and greens that didn’t exactly work with our palette, and couldn’t be altered in any way, but to me what was more important was making their home about them and the things they love, and not necessarily trying to match a certain color palette. Sometimes we have to bend the design rules for everyday living :-) My clients were very happy with the results. Here is another view of the family room

Family Room

Family Room


Family Room

Family Room

Good design does not have to break the bank. There are tons of creative ways to achieve affordable luxury in your home. Here are a few ideas that I like to recommend:

  • Repurpose the furniture you already have or change the look to suit your personality. Example – Painting a dresser using a metallic paint, reupholstering a chair in a beautiful, rich looking fabric, or adding moldings or other architectural details to a room, adding decorative panels to furniture pieces. O’Verlays Decorative Fretwork Panels is a great resource for taking a plain piece of furniture and make it look spectacular!
  • Painting a room or creating one accent wall in a darker shade or even using wallpaper. Doing a decorative wall treatment such as horizontal stripes or a faux finish, goes a long way to making a room look luxurious. Paint is your best friend when it comes to decorating
  • Arrange your accessories in new ways, especially seasonally. Adding a few items with some bling (do people still say that? :-) ) gives the illusion that they cost a bit more than they do. Do this sparingly and complement them with pieces that have visual texture, because you don’t want to end up with an 80′s Las Vegas lounge
  • The process of layering your rooms is what make them “sing”. It’s very much like getting dressed for a nice evening out. You start with a basic little black dress, and then layer on your jewelry, makeup, clutch etc. Same process with a room.
  • The use of color sets the mood and tone in a room, with paint having the biggest impact! There are so many other ways to bring color in for a luxurious look. I usually recommend keeping the big ticket items in a room neutral and add color through pillows and accessories, but if you have a favorite color that you’ve loved for years, why not go bold with a certain piece. For example orange is my favorite color and I would totally add an orange sofa in a room. How you use color is what makes the difference between affordable luxury and cheap & tacky :-(
  • This is a big one that seems pretty obvious but most people don’t do – Re-arrange your furniture…. and frequently (maybe even seasonally). Moving furniture away from walls helps to make a room feel more intimate and create conversation areas. It’s amazing how different a room can look with a new furniture layout.
  • Shopping at flea markets, garage sales and estate sales is another great way to bring luxury in without breaking the bank. This is where your rose-colored glasses will come in handy. You will sometimes have to look past yucky finishes and beat up appearances, and see the potential for a diamond in the rough.
  • Look through shelter magazines and other publications for current trends in interior design. You will often find that the high-end fabrics and furnishings that are usually featured on their pages have knock-offs that look alot like the originals. Knock-offs aren’t really a bad thing if you can get the look of luxury far more affordably.

Everyone deserves a little bit of luxury every now and then in their lives. Why not make your home that dream space that you’ve always wanted. A few simple creative touches often does the trick. If all else fails, call on Casa Vilora Interiors to help you achieve affordable luxury in your home. It doesn’t matter if you aren’t local to the Houston area, our Mail Order Decorator service is available and may be just what you need – a professionally designed room that you can put together at your own pace and as budget allows. Often times, you just need a plan to get started! If you are local to the Houston area, you can take advantage of our HappyNest One Day Makeover…..because we all love instant gratification.

Please feel free to connect with me here and contact me here

Check out our Holiday Promo featured on our FaceBook page. Like us while you’re there!

You can view my portfolio here

…….And before I wrap up for today, please support small businesses in your community on Small Business Saturday (November 30). Small businesses are the heartbeat of our communities. Here’s the link to my e-commerce site where you can purchase great items for your home.

…….And for the first time, I am participating in a couple of  Bloggy Parties. I’ve always wanted to be a part of this community of creative minds who understand what it is to be passionate about decorating and design. Feel free to go check them out and subscribe to their blogs as well as mine so you never miss out on some great decorating tips, ideas and how-to’s.

First up, one of my favorite Blogs Serenity Now! This will be such fun!

Weekend Bloggy Reading……And The Home Sweet Home @ The Charm of Home Blog

……And Be Inspired @ Common Ground Blog
Have a Marvelous Monday!

Be Inspired!

Digital_Banner


Budget Decorating: Styling An Ikea Etagere

I regularly receive emails from folks asking about budget decorating, especially how to  take an inexpensive piece of furniture and making it look fabulous. To address those questions, I decided to do a little segment every once in a while on my blog called “Budget Decorating” where I will highlight some projects done on a tight budget.

I have to admit that Ikea was never a place that I have shopped in the past for my clients, but I have found that one or two pieces placed in the context of a well designed room works just as well as a pricier piece.

I myself, have used a couple of their pieces to fill some space and add some function in my new work-in-progress design studio.

The office area (formerly the only bedroom in this old Victorian) is currently set up as a place to sit with my clients and discuss the numbers part of their design projects, review and sign contracts etc, and where I will be doing paperwork. I wanted it to be comfortable, light and airy and a clutter-free zone. I will be showing the finished space in a future blog post, but for now I wanted to focus on how I addressed a dead space that is the walkway to the other rooms in the space.

Since I am on a really tight budget I decided to bring in an inexpensive Ikea etagere to fill the area without visually or physically taking up space. I chose the etagere because it was open, with very clean lines and had glass shelves that helped to give it a less obtrusive appearance.

Ikea Vittsjo Shelving

Ikea Vittsjo Shelving

The etagere started out as a box of parts, and I am eternally grateful to my friend Courtney for helping me put it together. He was able to assemble it in about half an hour. The cost for this run of the mill metal shelving was $70.00

Here’s what it looks like now

After Styling of teh Ikea Vittsjo Shelving

After Styling of teh Ikea Vittsjo Shelving

I now call it an etagere because that sounds a bit more fancy than shelving. :-)

For about $120.00 I was able to solve the issue of the dead space in the walkway with something beautiful and functional. Most of the tcotchkes you see here, are just left overs from long ago projects or things laying around my garage from my recent move. I did purchase the new picture frames (pictures of the kids will be added :-) ) and rosette candle holders from ZGallerie. The etagere provided a great place to display a few of my design books and magazines.

The key to styling a bookcase, etagere or shelving is to mix up the textures, layering, adding various heights and levels, adding softness with florals, keeping the colors fairly consistent or complementary, and using things that have special meaning to you. I displayed a few of my favorite design books & magazines, and my 1920′s peacocks are a favorite treasure – I love peacocks and birds in general :-)

Other items that you can use are baskets or storage boxes on the bottom shelves to add some visual weight and ground the whole unit. I chose not to because I wanted to keep it open and airy.

This etagere can be used in any room of your home really – In a kitchen as extra storage for cook books, wine bottles or dishes. In a bedroom closet as a place for shoes or sweaters. In a game room or kids’ play area for storing games and toys. In a laundry room for storing detergent and cleaning supplies. In a garage to get things up off the floor (if you’re anything like me :-) ), and even in the pantry for storing cereal boxes and canned goods. You can even ”bunch” two or three or more side by side to fill a large wall space and add tons of storage in a room.

Where would you use this Ikea etagere and what are some favorite items you would display? Leave me a comment below

One more thing before I go. If you like Ikea prices but not necessarily the look of some of their pieces, this website has tons of products and ideas that you can use to add some fabulousness to a plain piece. Check out O’Verlays Decorative Fretwork Panels to see what I mean

I hope you have been inspired by my budget decorating! Now go forth and decorate! :-)

Please share this post and contact me here if you have any questions about my design services. You can also connect with me on social media through the same link.

Visit my online store to purchase designer bedding, pillows, rugs and the recently added doggy styles (dog fashion, beds and carriers).

Have a very blessed Monday!

Be Inspired!

Check out the new DOGGY STYLES category on our online store

Check out the new DOGGY STYLES category on our online store


7 DIY Decorating Ideas Under $100

You asked for it, and here it is – A list of practical decorating ideas that you can do yourself for under $100. So without further ado, here goes:

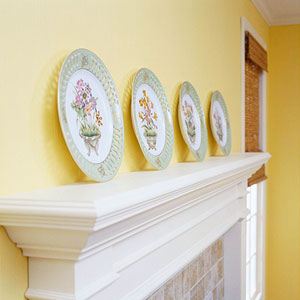
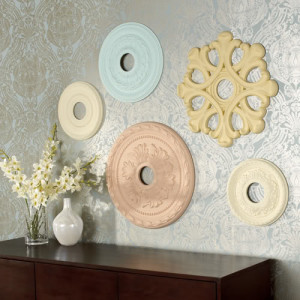
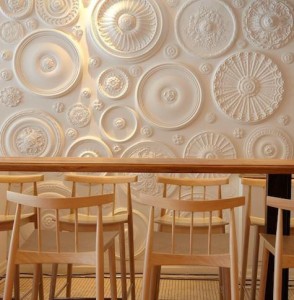
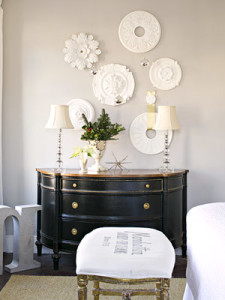
1. Ceiling Medallions As Wall Art

You’re familiar with those plaster or plastic ceiling medallions used for hanging light fixtures…right? Bet you won’t look at them quite the same.

ceilingmedallionwalldecor_xxlarge


Medallians


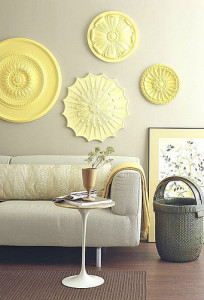
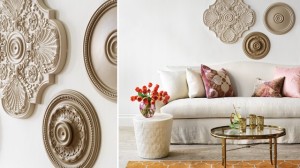
They can be painted into whatever color your heart desires and can easily be hung with a picture hanging kit from Home Depot or Lowes. Hanging them in groupings have a much bigger visual impact. Take a look

adcbcec863965257177015621_hGNEOvlp_c


ss_101024104


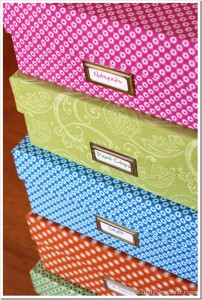
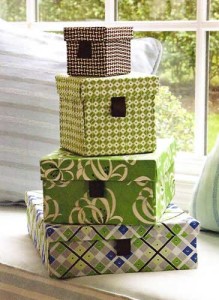
2. Fabric Covered Boxes

If you have fabric remnants left over from another DIY or sewing project, you can use them to cover wooden boxes. You can find these at your local craft store like Michael’s and Hobby Lobby. Your local fabric and craft store may also have fabric remnants for very little cost.

diy-fabric-covered-boxesb


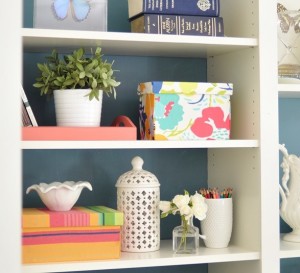
Fabric covered boxes make a great decorative element when styling bookshelves or they work great for storage in other parts of your home. Here’s a quick how-to instructions on creating your own fabric covered boxes from Centsational Girl Blog

Stack-of-fabric-covered-box_thumb5-cheap-home-decor-02


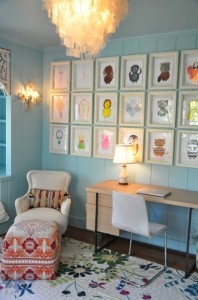
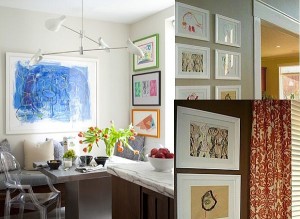
3. Children’s Artwork As Framed Originals

I have touched on this one before in a previous blog post “It’s The Little Things”. Kids create such wonderful and colorful art, that always have a fun or cute story behind them.

home-design


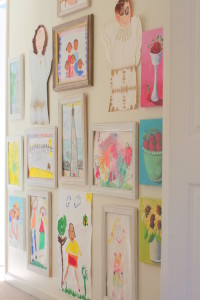
All you need for this project is artwork, matte boards and frames, which are available at Micheal’s or Hobby Lobby. Hanging them salon style or in a neat grid on one big wall has such a major impact, not just on your decor, but on your child’s self confidence and creativity.

tumblr_lqq6pemhNu1r2v5r9o1_500

FRAME-~1


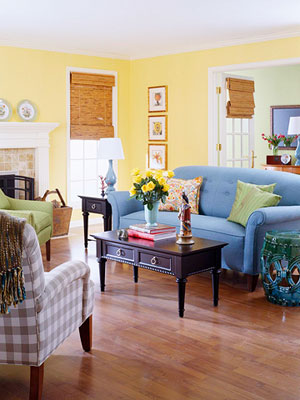
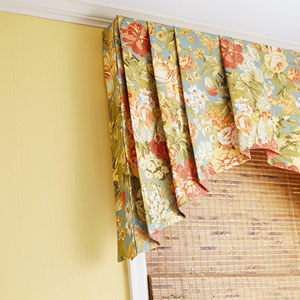
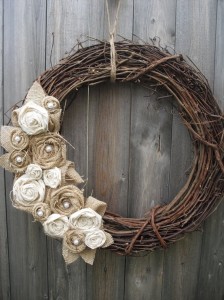
4. Decorating With Burlap

It’s no surprise that these days burlap has become widely popular and in demand for home decor. You can now find burlap on fine upholstery, pillows, drapery and home accessories. But did you know that burlap was used for packaging coffee and sugar? The rustic, textural character of burlap is what makes it so desirable. It lends itself to a homey, cozy feeling, which is always welcoming in home decor.

1850321-entry-hall-xl[1]


It is now available in colors other than the traditional beige/brown color. In fact we have custom burlap drapery panels available on our online store starting at just $269 per pair! But if you have basic sewing skills, you can make your own for under $100.00. Or maybe a pillow, tableskirt or even a wreath is more within your comfort zone? Here are some inspiration photos

burlap-flowers-and-twigs-fall-wreaths-and-decor-ideasburlapoverlay


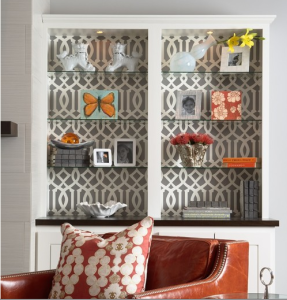
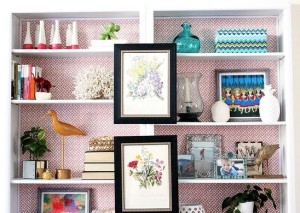
5. Wallpapering The Back Of A Bookcase

Built-in bookcases are a great architectural feature in a room. Why not dress them up with remnant wallpaper that you can find at your local wallpaper supplier quite inexpensively. Peel and stick wallpapers are widely available online in wonderful colors and patterns. Roommates Wall Decals is a great place to start.

wallpapered-bookcase-bhg


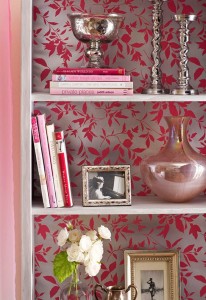
One thing to consider when picking a wallpaper for this application, is to look for bold or geometric patterns or a pattern that will not get lost behind the decorative accessories that will be placed on the shelves. keep accessories to a minimum, as the wallpaper is the big feature and you want to avoid a cluttered, over decorated look

Picture 4936451078203935498_qlp7EoYG_f1


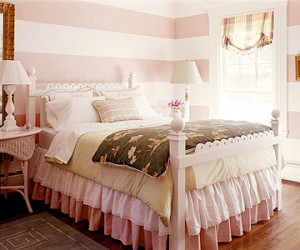
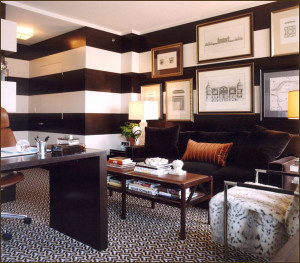
6. Painting An Accent Wall….. Or Four, With Large Horizontal Stripes

Painting an accent wall a darker or bolder color is a great way to add a focal point to a room that lacks any architectural interest. Instead of stopping at just a solid coat of paint, why not do a horizontal stripe detail?

feng-shui-bedroom-decor-blue-white-stripes


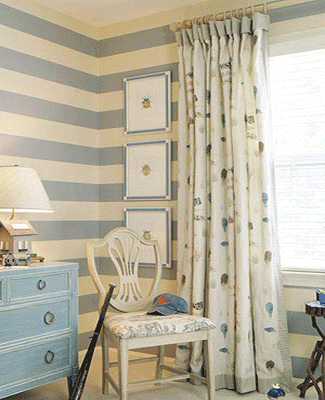
Depending on the mood you want to create in the room, you can go with 2 colors with a high contrast for a bold look, or two colors that are close in value for a more monochromatic or tone-on-tone look. Metallic paints work great for this application as well, but keep in mind that metallic paints will cost a bit more. The stripes should be at least 8″ thick for a more updated look. Here are instructions for creating horizontal stripes in a room

12_20_09-pink-striped-bedroom-bed-bhgrobert-passal black white striped walls decorati


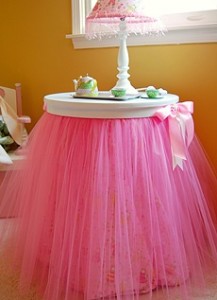
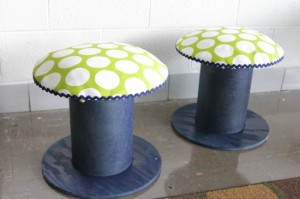
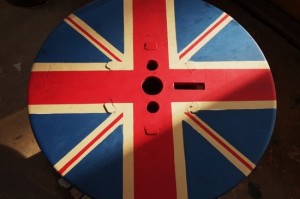
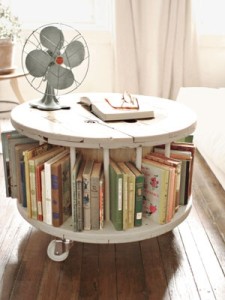
7. Electrical Wire Spool As A Table, Stool Or Ottoman

This one is my personal favorite! Who knew that such beautiful pieces could be made from those not so attractive, industrial spools. Electrical wire spools can be found at electrical supply stores or do a google search and you will find many resources for where you can purchase them very inexpensively.

7c5ff49aaf5d85e377f10ada55cb5ba8


The structure of the spools themselves don’t require alot of rework. A can of paint is enough to transform them into something special. But if you want to take it a few steps further….check these out.

aaaf3b7d3e3844936067774aed9a85e0702f0897a22cbd255add841b76d28a0b

SAMSUNG DIGITAL CAMERA


b599a042e459b71bfd5b75eab8414fe6


So there you have it – A list of seven fun DIY decorating projects for under $100. Now it’s time to go forth and decorate! :-)

Please don’t forget to comment and share if you found these tips useful. You can also check out my monthly newsletter “Pocket Decorator” for more fun design tips, ideas and inspiration. Click here to subscribe. I promise I won’t flood your inbox with emails.


Be Inspired!

Veronica Solomon

Veronica Solomon


Tips For A Quick And Inexpensive Kitchen Makeover

109_21

Are you in the market for a major kitchen remodel? Maybe after some research and even getting a few quotes you realize that it may be out of your budget for the moment. A mini kitchen makeover might be all you need to freshen up and update your kitchen.

Here are a few easy and inexpensive things you can do to breathe new life into your kitchen:

  1. Paint cabinetry instead of replacing them. Cabinets are undoubtedly the big ticket item in a kitchen. Instead of replacing them altogether, painting them might be a much easier and less expensive solution…especially if they are good quality hardword. Perhaps they are the shorter 30″ or 36″ cabinets? A good finish carpenter can add cabinetry above the existing ones and tie them in with glass inserts or another decorative insert to look like they’ve always been there. Of course you have to have the space above your existing cabinets. Even if there is a bulk head, there may be hidden space above, so be sure to check.
  2. Add an island if you have room. It doesn’t have to be a large one; A 28″x48″ island is just the right size to add some extra storage and convenience in your kitchen. A good finish carpenter can add one for you very inexpensively or you can purchase a ready made one. It’s also very visually appealing to paint or stain the island a different color than the other cabinets and adding a different type of surface.
  3. Upgrade countertops to granite, quartz, corian or concrete. These can be very pricey, but sometimes you can find great deals if you shop around.
  4. Update light fixtures and add more lighting if at all possible. Undercabinet lighting strips that plug in are quick and easy to install and make a huge difference
  5. Adding hardware to cabinets. This may seem like a simple idea that won’t make a difference, but I am here to tell you that adding the right hardware to cabinets makes a huge difference! Hardware dress your cabinetry like jewelry does a little black dress
  6. Consider replacing appliances with quality commercial grade appliances. These can be very expensive but may be worth shopping around for a bargain. There are scratch and dent stores in some cities where you can purchase gently used or store display appliances for alot less. Good quality appliances will last a very long time, so when you are finally ready for the big renovation, you already have them and won’t need to purchase them again!
  7. Consider Open Shelving in place of some cabinets. Open shelving is not for the feint of heart – it has its downside. You have to stay organized and dust regularly, but they are beautiful to look at it. They are great for visually “breaking up” a long bank of cabinetry. Consider putting a great looking, colorful or textural wallpaper or even paint behind the shelves to add interest or a focal point in the kitchen. This is a great place to highlight and group a collection like ginger jars or china
  8. Consider replacing some cabinet doors with glass inserts. Much like open shelving, they “break up” the look of a long bank of cabinets. You can also add wrought iron, chicken wire or even fabric inserts instead of glass.
  9. Hang a pot rack above the island or backsplash as a convenient way to get to your favorite cooking utensils. The better looking the pots are, the better
  10. Add window treatment. Kitchens have so may hard surfaces and hard lines. A great way to introduce some softness and color is to add a window topper or panels if you have large windows. Layering window treatments is also a great idea in a kitchen. For example, you can add a natural woven shade for privacy and a pair of drapery panels as a decorative layer.
  11. Update the backsplash. One of my pet peeves is walking into a kitchen with no backsplash (drywall for a backsplash). There are so many products available that can be used for this purpose…the sky is the limit! The most common backsplashes you will find are ceramic tiles, travertine tiles, porcelain tiles, slate tiles and mosaic tiles. Anyone of these options is fine, just be sure to make sure it coordinates well with your countertop.

5883ffe4d8dc


So there you have it, 11 things you can do to freshen up your kitchen. Doing them all might be just as overwhelming as a full remodel, so pick a few from the list and go forth and decorate!

Be Inspired!

Veronica Solomon

Veronica Solomon


High Style On A Budget

As an Interior Designer, there’s no greater joy than landing a project with a very generous budget to source beautiful, high-end and on trend furnishings. But the reality is that most projects are for average, working class families who desire a beautiful and stylish home, without spending their kids’ college savings. There is a fine line, however, between what’s a reasonable budget and the HGTV culture of redesigning a whole house on a $1000 budget! One of the things I do at every consultation is talk about a client’s budget and their expectations for what it will get them. Clients are usually hesitant to discuss that with their designer, but it is very necessary to set expectations from the very beginning. Sometimes clients just don’t know what designing a room will cost, so it is my job to educate them. It sometimes comes as a shock that a living room design, for example will start at around $20,000. But let’s just say you don’t have $20,000 to redo a room. Should you give up and live with a less than perfect space? Absolutely not! A well designed room has the power to change lives, so why rob yourself of that. Here are a few things you can do to keep your decorating budget in check and still achieve high style!

  1. Repurpose or refresh items that you already have. If you decide to do this, take a very honest look at the piece you wish to repurpose. Please ensure that the piece is the proper scale for the room. Repurposing could mean painting, refinishing, reupholstering, but if the scale is wrong for the room, it won’t work!
  2. Shop flea markets, estate sales, eBay etc.- This is not your ticket to go out and purchase a bunch of second-hand furniture just to fill the space. There should be thought put into whatever you choose, and items should complement the overall design scheme
  3. Mixing high-end with not-so-high-end – I highly encourage doing this anyway, whether I am working with a big budget or not. Invest in quality high-end, high quality pieces that will be used quite a bit, like your upholstery, beds, dressers. Other items such as pillows, and accessories can be on the lower end.
  4. Get it done right the first time – Hire a designer to help you if you are not confident in your decorating skills. Even if it is just for a consultation or to help you come up with a design plan that you can then take and do yourself. I have seen so many people spend good money on furnishings and paint etc, and then two years later hate it so much that they decide to call in an Interior Designer to fix it. It is much better to get it done right the first time. You’re going to spend the money anyway; spend it right. We are developing and will be offering soon a new service called “Mail Order Decorator” where clients can order a full design plan for a room from us and implement it themselves. Details available on my online store.
  5. Decorate in phases. It is overwhelming when you have an entire house to decorate. the best approach is to prioritize and work in phases. Decide if you’d like to start with the public areas like living room, dining room and kitchens first or the private areas such as bedrooms. Getting one room at a time done will give you a sense of order and accomplishment and gets you excited to moving along. Many of my clients do it this way.

Here are a few of my favorite furnishings that will not break the bank, but will definitely give you the look of high style in your home.

28304_l stein


This serpentine chest from Steinworld retails for around $750.00

Wholesale Interiors


This bed from Wholesale Interiors retails for around $1000.00

193_11_06_silo


This versatile piece from Stanley Furniture can be used as a desk or console or even a small dining room table. It retails for around $1600.00

64701_L


A beautiful credenza from Steinworld

642_50_001_silo


Nesting tables from Stanley Furniture

untitled


Bench/Banquette from Wholesale Interiors. This retails for around $600.00

Langa_comforterSet


This bedding and others available on my online store and retails for under $500.00 for the entire set

T_WithoutZoom


Or this gorgeous sofa from Ballard Designs that retails for under $2000.00

My advice to you if you decide to take on your decorating project without the help of an Interior Designer, is to plan your purchases carefully, do a furniture layout using either graph paper or by doing a google search for a consumer version of a space plan software. Look for the best quality and value you can find. Look for pieces that have a feel of timelessness….ask yourself “will I still like this item many years from now?” Try not to buy an entire set of furniture that all matches. Most furniture retailers show a set of furniture to get you to buy more items than you need. Don’t skimp on your window treatments; they are one of the focal points in a room, and if badly done, can bring the whole room down. Our online store has plenty of custom drapery panel options available starting at only $269 per pair! And the most important advice I can give you is to have fun with decorating. Nothing sucks the life and energy out of you faster than a decorating project that leaves you frustrated and overwhelmed. I’m here for you if you need help!

Be Inspired!

Veronica Solomon

Veronica Solomon


A Living Room Redo For Under $10,000

One of the best things in the world of Interior Design for me, is finding the new, innovative products just as they hit the market. I am always intrigued by classic designs redone in a more contemporary way. As promised, I will be using some of these “Fun Finds” to design virtual rooms to help inspire my readers. Today’s virtual design is a living room done for under $10,000. The styling is classic but contemporary in a monochromatic color scheme. When styling a room I always try to stay away from the “matchy matchy” syndrome. Using matching sets of furniture isn’t horrible, but tends to look like a furniture showroom. A room done in several different pieces that complement and coordinate, instead of matching will appear more custom and homey.

First we’ll start with the walls. I decided to bring in some natural grasscloth to add some texture and a cozy feel to the room. This Arrowroot super fine wallpaper from wallpaper To Go is perfect.

Next we’ll bring in our seating. This classic sofa from Room and Board is available in a variety of fabrics. I chose this linen color to act as one of the foundation pieces in the room.

Next we will add a couple of these chairs from Noir Trading. They also lend themselves to a classic design but done in a contemporary way. The outer back of the chair will remain in the solid fabric, but the inner back, inner arms and seat cushions will be done in the geometric linen fabric shown. This will give the chair a very custom and unique look.
Our next addition to the room are a couple of ottomans to add some more seating and function to the room. These brown and white cow hide ottomans from Arteriors are just perfect
We now have all our seating selected for the room. Next we’ll bring in the area rug. Rugs are necessary in any room to help define a space, such as a seating/conversation area or to help with the acoustics in a room. They are especially necessary on hard surfaces like hardwood or tile floors. In some cases I will even recommend to my clients to place an area rug over wall to wall carpeting. When placing an area rug, make sure it is large enough so that all the seating is sitting on top of the rug….even just the front legs. This will make for a more pulled together feel and better flow. This beautiful rug from Safavieh is a great addition to the monochromatic color scheme we have going on
Next we’ll bring in the occasional tables. We will bring in a cocktail table and two side tables. I am not a big fan of a matching set of tables. Instead we will choose three different styles with some common features that will allow them to complement each other and the space.
The cocktail table is from Noir Trading. The beautiful yet simple lines of this piece gives it a classic elegant feel with a global touch.
This side table from Arteriors is very different, but has a nature inspired feel. There’s no mistaking that this is going to be a conversation starter in the room

Next we’ll bring in a set of nesting tables. These are great in any space because they can be moved around the room when needed for extra surfaces to place a drink or a good book. These simple pieces from Arteriors are just the ticket.

The room could also handle a console table for behind the sofa. We will introduce this gorgeous piece from Noir Trading

Now for some storage. These beautiful bookcases from Arteriors will add some height to the room while allowing for some much needed storage.

Now for some lighting. We’ll bring in some table lamps and maybe a chandelier that will hang above the cocktail table. These lamps are from Arteriors and Trend Lighting.
Now for the textiles. We will be introducing our drapery fabric and pillows
This beautiful nature inspired silk from Kravet will be made into non-functional pinch pleat panels that will frame the windows and add warmth to the room. The nature inspired finial shown below is the perfect complement.

Now for some pillows. Pillows are great for adding a homey comfortable feel to a room and a great way to break up the solid mass of the sofa color.

Now for some art from Paragon

And some accessories from Global Views

So there you have it; a beautiful functional room done on a small budget. Hope you are inspired to create the room of your dreams.

My top three Fun Finds for this week are:

A side table all blinged out
A lucite trunk
A cow hide mirror
www.casavilorainteriors.com/products.php

Decorating in Stages

In today’s economy where consumers are trying to get the most for their money, decorating a living space is no exception. There is a great hesitation, however when it comes to taking on a decorating project. The common misconception is that it all needs to be done at once, and it will cost a small fortune. Enhancing a room can be easy and cost conscious if it is carefully planned and evolves as time and budget allows.There are great benefits to decorating in stages:  (1) by taking the time to get to know the space and how you want it to function will leave no doubt in your mind about what pieces of funiture the space needs. (2) by assembling a room in stages you have more time to do research, comparison shop and take advantage of seasonal sales and markdowns.

While the end result can be beautiful, the process can be a bit haphazard. Here are a few ways to simplify the process and still end up with the same great results.

Stage One

Painting the room will give you instant gratification and the biggest impact in the space. Paint is a very inexpensive way to change the look and mood of a room. If you are handy with a roller and paint brush, then it is a great do-it-yourselfer project which will save you the expense of hiring a paint contractor.

Adding window treatments is also a great way to give a big impact right away. Most drapery workrooms can customize simple drapery panels for not a lot of money. If a custom workroom is still beyond your budget, try purchasing ready-made panels at any home decor store. The draw back to this is that you have to work around the color schemes they have available, and they are usually a bit shorter than most standard windows require. If choosing a color becomes an issue, then stick to something neutral that will work with any color scheme. If the panels are shorter than what you need, you may be able to attach a coordinating fabric to the top or bottom for a custom look. If you are handy with a sewing machine, then the sky is the limit!

Arranging the existing furniture you have is the next step in stage one. If you only have a few pieces of furniture, it’s best to arrange them in one main conversation area for the biggest impact, instead of lined up against walls. Later as you acquire new pieces, you can arrange secondary seating areas throughout the room. It is best to always start with a scaled floorplan. It doesn’t have to be a professional floorplan; all that is needed is a piece of graph paper and a tape measure. Play with different arrangements to find the one that’s right for the room.

Finally in stage one, arranging your existing accessories in a pleasing way. Remember that sometimes less is more, so resist the temptation to bring too many small scaled pieces back into the room. Adding pillows to a sofa is a very inexpensive way to make a big impact and enhance your color scheme.

Stage two

Bringing in an area rug at this stage is a great way to define the conversation area and anchor the furniture arrangement. It is important not to skimp on quality when it comes to area rugs, but with some good research you can find great quality rugs for under $1000 and have money in your budget for some more accessories or even an accent chair or two. Keep in mind you are always tweaking your floorplan for each new piece of furniture you add.

Stage three

Bringing in some art work at this stage will get the room to the “fiinished” look. Also adding a secondary seating area complete with an occasional table will finish off the room. This is the stage where you can consider reupholstering the sofa if it was a bit more worn than you would like. Maybe replacing the ceiling fan with a fun new light fixture or adding another layer to your window treatment.

Each stage should be an improvement and should take you one step closer to a full makeover. At the end of these stages, you will have a beautiful and well pulled together room. Here are some tips to keep in mind:

1. Be systematic and organized. Start by arranging the furniture you have. Evaluate it to see where the holes are, then make a shopping list and prioritize it. When shopping, always carry a list of measurements (doorways, windows, etc.), samples of fabric or carpet, and paint or wood chips.

2. Give furniture a test drive. Take furniture out on approval when possible. The best way to see if it really fits in a room is to try it there.

3. Watch for bargains. Showroom sample sales are great places to pick up designer furniture at good prices. To find out when these sales happen, call your local design center or check the website of a showroom you like. Add your name to the mailing lists of favorite retail stores to be notified of big sales.

4. Don’t settle. It’s tempting to buy furniture as a quick fix to fill a room, but such purchases often are unsuccessful long-term solutions. Only buy furniture you really love.

5. Consider using a designer. Interior designer fees vary, but you can usually count on their time costing 10 to 15 percent of your budget. Although that means around $300 of a $3,000 budget, a designer’s recommendations could help you make sound choices that save money in the long run.

Photos Source: BHG.com
Please click here to contact me for questions about my design services
Be Inspired!
Veronica Solomon

Veronica Solomon